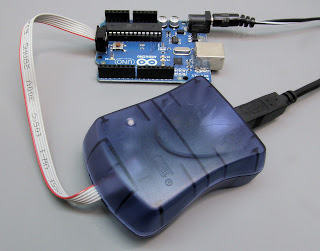
 Using Arduino's built-in serial bootloader to upload and run programs is convenient, but a dedicated programming device like the AVRISP mkII can:
- Program blank (bootloaderless) AVR chips.
- Reduce the time required to upload sketches to the Arduino.
- Save the program memory required by the bootloader.
- Let you program minimal-hardware -inos without a USB/serial adapter.
- Eliminate the issues involved with sharing a UART between the bootloader and a peripheral (such as our serial displays).
This note will offer a few hints and tips for getting started with the AVRISP mkII with Arduino, since this is different from using it with Atmel's development software.
 |
| Arduino-compatible serial OLED: $39 at seetron. |
General Notes
- The AVRISP mkII costs about the same as an Arduino board, $37.50 from most Atmel distributors at the time this was written.
- If you're going to use the device exclusively with Arduino, you do not need to install the Atmel development software.
- If you do install the Atmel software, you will still need to install the AVRISP mkII drivers for Arduino, since the Arduino IDE uses a different method (AVRDUDE) to communicate with the programmer.
For the purposes of this note, I installed the programmer onto two PCs: one running Windows XP, the other Windows 7. In both cases, I deliberately took the path of least resistance, trying the laziest, most-obvious approach and fixing issues as they cropped up.
Installation #1: 32-bit Windows XP
When I plugged the programmer into the XP machine's USB port, the usual installation dialog popped up. I took the default route of 'allow(ing) Windows to locate drivers.' It whirred for awhile and ultimately failed to install. That was expected and OK, according to my research.I then repeated the installation process, but this time took the option to specify the location of the drivers. In the 1.02 version of the Arduino software distribution, they reside at
arduino-1.0.2\hardware\tools\avr\utils, but I just pointed the install dialog at the Arduino folder and made sure that the search-subfolders box was checked.The installation was successful this time.
Installation #2: 64-bit Windows 7
With Win 7, I followed the same procedure as described for XP above. Everything failed, including the previously successful approach of specifying the driver location. Win 7 complained that the driver was not digitally signed (a security precaution), but the warning was worded in a way that suggested that it might work anyway. Nope.Online, I found that the author(s) of the MightyOhm blog had already encountered and solved this issue. I downloaded their drivers from this page, unzipped them, and tried again. Went to the Device Manager, Update Driver Software, and picked Browse for Driver Software. Pointed it at the 64-bit driver folder within the unzipped MightyOhm files, and it installed successfully
 Using the Programmer with the Arduino IDE
Once the drivers were installed, I connected the AVRISP to an Arduino Uno's ICSP connector as shown. I also connected a 9VDC power adapter to the Uno, since the programmer does not power the board. Booted the Arduino software and picked Tools-Programmer-AVRISP mkII from the menu. Opened a sketch and tried to upload. Failed. Consulted the documentation and found that you must press Shift-Upload (or Ctrl-Shift-U) to get the software to use the programmer. Tried again with Shift: Success.Next I removed the Uno's ATMega328 and replaced it with a blank ATMega328. Shift-uploaded a sketch successfully, but when the sketch ran, the serial timing was off. On a hunch, I tried
Tools-Burn Bootloader, and then re-uploaded the sketch (using the AVRISP mkII, not the bootloader). The timing issue was fixed.I haven't researched this, but I suspect that the initial upload to the blank chip failed to set the correct oscillator config. Burning the bootloader set the config ("fuse bits") and fixed the timing, even after the program was replaced. That was the basis of my hunch, anyway.
Further Research
I plan to investigate the Win 7 driver issues, and the mystery of the bootloader/fuse bits. If you have any insights, feel free to post them in the comments.Reminder: Reinstall the Bootloader
There are times that it may be more convenient to use the bootloader instead of AVRISP. For example, some demo programs use the IDE's serial monitor to display debug data, and they rely on the USB/virtual serial port.If your Arduino was last programmed with AVRISP, you must reinstall the bootloader from the IDE's
Tools menu before attempting to upload a program the old-fashioned way. If you don't, you will get an avrdude error message that resembles the one that indicates driver problems. Don't be fooled: Watch the lights on the Arduino during a download attempt. If you see a couple of flashes at the moment the download begins followed by a whole lot of nothing, avrdude is sending data to the -ino, but the bootloaderless board isn't responding. Reconnect the AVRISP and install the bootloader; all will be well. |
| Arduino-compatible serial OLED: $49 at seetron. |
Here are updated instructions for 1.0.5: http://ibuildthings.ryanblace.com/2013/12/avrisp-mkii-arduino-105.html
ReplyDelete